Ultimate Christmas Planner {FREE Printables}
I am a planner and a list maker. I am not that organized so I have to write everything down to keep track of it. Here are a few things helping me through the...
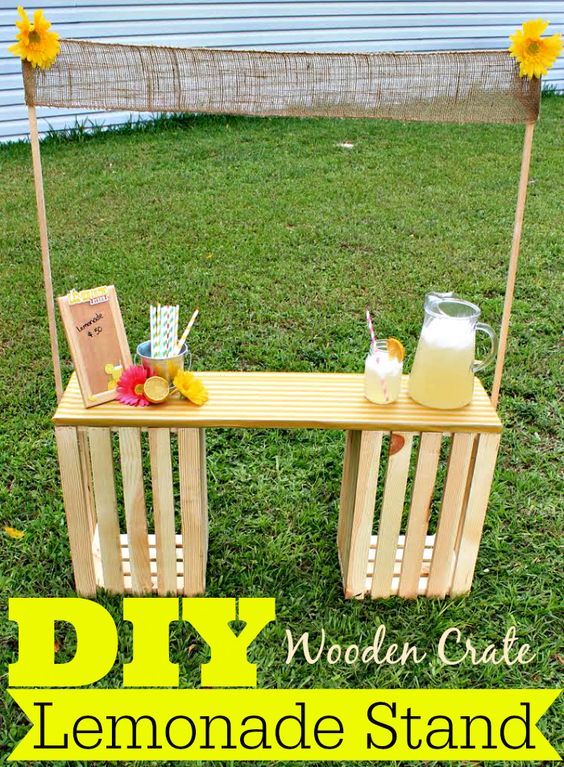
Hot summer days and bored kids leave you looking for things to do and ways to cool down. Ice cold lemonade from your very own lemonade stand can help you with both of these. Give the kids a little extra pocket money with a lesson in entrepreneurship. This lemonade stand was pretty inexpensive to put together, and only took about half an hour to build once I had gathered all my supplies. We hope that you love our DIY Lemonade Stand Made Out of Pallets.
The counter can be covered in a pretty wrapping paper to give it some pizazz and then in contact paper to make an easy to wipe clean surface- you can just use a printed contact paper if you find one you like, I found a lot more options available for patterns in wrapping paper so I went that way. Leaving it simple means that it can be used for a lemonade stand but also as a dramatic play counter for; a bakery, candy shop, produce stand, grocery store, and more. You can pick up these exact crates at Walmart for $8.97/ea. or any hobby and craft store should carry some comparable as well. We got our pallets from a guy on Nextdoor. I've gotten them off of Craigslist, Facebook Marketplace and from driving by somebody getting rid of them.
 Wooden Crate Lemonade Stand
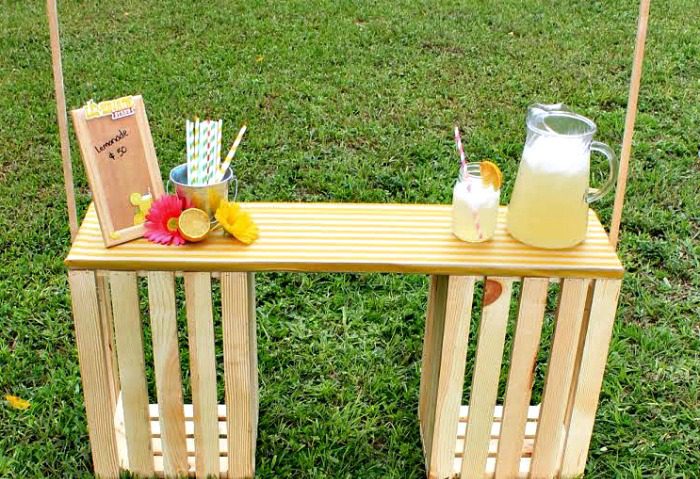 Directions
We hope that this DIY Lemonade Stand Made Out of Pallets or wooden crate lemonade stand post inspires you. Happy building!


I am a planner and a list maker. I am not that organized so I have to write everything down to keep track of it. Here are a few things helping me through the...

DIY Twine Christmas Ornament Making ornaments isn't something that I have done a lot of. My kids seem to do them in school every year and bring them home which I lovingly hang on...

This post is brought to you in partnership with Waverly Inspirations and its parent company, Iconix. I have been compensated for my time. All opinions and ideas are my own. We hope you love our...

Party Hat Paper DIY Easter Basket Who says you need to buy all of your Easter supplies brand new? You can still have some frugal Easter fun using items you already have around the...

In these crazy days of TV, games, computers, ipads and smartphones (which are all great) this is the kind of thing that has been lost! I can remember growing up and having a kool-aid/lemonade stand every summer. It was one of the things we looked forward to. Ours were never as cute and nice as this one, but it got us outside and having fun! I never pass one when I see one now!
That’s adorable! I’ve used crates as multiples put together for kitchen items, in a corner. They have to be anchored to each other and to the floor, etc. to be safe, but inexpensive and cute!
My kids set up lemonade stands all the time. Love this idea, portable, can carry your supplies in the crates and cute too!
Wow. Your Lemonade Stand is adorable and very creative. Thank you for sharing. I pinned it.
Thanks so much for sharing on craft schooling Sunday!
This is such a cute lemonade stand! I wish I had one of these when I was a kid! I hope you’ll share this project over at Motivational Monday this week: http://makingitinthemitten.blogspot.com/2015/06/motivational-monday-june-14th.html
I keep eyeing those crates whenever I’m at the store and this is such a great way to use them! I’d love for you to share this at our Creative Inspiration party!
This is so adorable! It looks super simple to make, too. A great idea for taking a child’s lemonade stand to the next level! Thanks for sharing!
What a wonderful idea. This is just adorable. I really want to make one for my grandkids. Thanks for sharing. Stopping by from Share It Link Party
This is so flipping adorable! I would have LOVED one of these during my many summers of selling lemonade as a child! What fun 🙂
I love this idea! My kids used to love selling lemonade and smoothies! I think something along this line would be a great drink station in my backyard.You’ve got my creative juices flowing! Thanks!
This is such a great project. My girls love to play “store” and I can imagine they would play for hours with this. It also reminded me of Lucy in the Charlie Brown comics: the burlap banner just begs to have “Psychiatric Help 5c” added to it!
This is such a cute idea! And what a way for them to learn a little bit about being an entrepreneur. Definitely something my youngest would love. Thanks for sharing at Inspire Me Wednesday. Featuring you in this week’s issue.
That’s a nice one Stacie. the stand really looks beautiful. It seems that there is so much that one can do with a simple wooden crate. although I am not usually the best when it comes to wood-work, I think I should really give this one a shot.
Cindy
Pingback: How to help your child hold a successful lemonade stand
Pingback: 27 DIY Lemonade Stands For Your Kids To Have A Fun Summer – The Self-Sufficient Living
Pingback: DIY Lemonade Stand Projects – Party Ideas
Pingback: How to Build a Pretend Play Ice Cream Stand – Merriment Graphics
Pingback: Arrow Art Ideas DIY Easy Craft Trendy Home Decor Girls Night In