Minnie in Paris Duct Tape Handbag Tutorial
 Minnie in Paris Duct Tape Handbag Tutorial
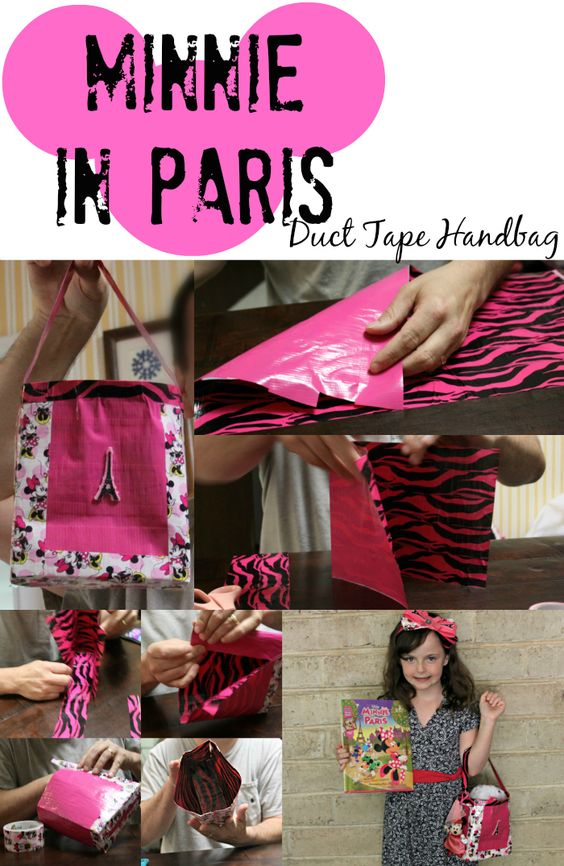
We are back with another fun tutorial with our favorite, Minnie Mouse. As she heads to Paris in her latest book, we make some adorable accessories so that we can follow along in style. We hope that you love this Minnie in Paris Duct Tape Handbag Tutorial.
You may have seen my recent post about the fabulous Minnie Mouse in Paris headband hair bow that we made:
Minnie in Paris Hairbow Headband {Step-by-Step Tutorial} #MinnieinParis
Minnie in Paris Duct Tape Handbag Tutorial
Supplies
- Good glue – we used Alene's Original Tacky Glue (I love that stuff)
- Plastic headbands (you can also use metal but I couldn't any really durable ones)
- Duct tape
- Washi tape
Embellishments
Directions
- We need to make a big sheet of tape “fabric” We want it to be 2 1/2 times wider than our bag and around 3 inches taller than the height of the bag. We start by Layering the first side of our tape fabric sheet.
- Next we add the second side to our tape fabric by layering our tape sticky side to sticky side.
- Once we have our sheet finished, we need to trim. Our bag was 7 inches wide and 2 inches deep. To figure out how wide your sheet should be, multiply both the width and depth by two and add everything together. In our example, we would say 7×2=14, 2×2=4, 14+4=18. So we need our sheet to be 18 inches wide. Trim it up! Our bag was 8 inches tall, so we measure our height and trim. Remember to save the scraps, as we will use those to create the bottom and strap for the bag.
- Create your sides. Measure 2 inches in and make a fold from top to bottom. Now measure 7 inches from the fold that you just created and fold again. Finally, measure another 2 inches from the last fold and..yup…fold again. Think of it like this, you are trying to create the sides of the bag.
- Using one of the scrap pieces, create the bottom of the bag. It should measure 7×2.
- Now begin attaching the bottom with the Mickey tape one side at a time.
- Reinforce all of the edges with the Mickey tape.
- Using the scrap tape fabric, cut a handle.
- Attach the handle with the Mickey tape by running the tape around the top of the bag.
- Decorate the outside of the bag as you wish. Enjoy the bag!
Instructions are coming next week on how to make your own Minnie in Paris matching headband. Now find yourself a cute model like the one below to wear your fabulous creations. 
About Minnie in Paris
You didn't think that I would leave you without telling you about the book, did you? Fashion is Minnie's passion! And, as a result, she's been invited to show her bows on the runways of Paris! Minnie in Paris begins At the airport, Minnie is so busy taking care of her nieces, Millie and Melody, that she accidentally switches suitcases with Penguini the magician–and finds that his suitcase is full of bunnies instead of bows!
Minnie must round up the mischievous little bunnies, find Penguini, and make her bows in time for the show. Will she make it? Readers are treated to a stunning tour of famous Parisian locations, from the Louvre to Tuilleries Gardens to the Eiffel tower, to a classic Parisian bistro—all in search of Penguini's bunnies.
Definitely get the Minnie in Paris book for any Minnie Mouse lovers in your household. We hope that you are inspired by this Minnie in Paris Duct Tape Handbag Tutorial. Happy crafting!
Get social
Minnie in Paris product page | Twitter | Facebook
What city would you like to see Minnie Mouse in next?
Disclosure: This Minnie in Paris Duct Tape Handbag Tutorial post is part of a sponsored campaign for Minnie in Paris. Project idea and opinions are entirely my own. #MinnieinParis
You May Also Like


really cute idea! I think my daughter would love it (along with a trip to Paris, of course).
That came out so cute!! She really looks like she loves it. And all things considering, it’s pretty easy to make!
What an adorable hand bag. It’s so cute, and it looks fairly simple to make.
This is so cute and so creative.
This is SO cute! Your step-by-step photos will make it a breeze to do myself!
This is really cute. I have a Minnie fanatic at my house that would adore this bag.
The bag turned out great. What a cool little project to with duct tape.
What an adorable handbag! I love that you guys were able to make it yourself, it makes it that much more special!
This is quite possibly the cutest use of duct tape i have ever seen.
Wow, what a very through review on how to make this purse! Thank you!
How cute is this? What a great project for my daughter. I am surprised to see how many different choices are to be had now days with Duct Tape. Who doesn’t love Minnie? Thank you for you instructions as they are very easy to follow. We are going to do this.
This is just too cute. I want one for ME! I guess Ches can have one too. 🙂
This looks like such a fun project. It turned out great. I love it!
My girls are all about this! I love the prints with the pink and black tiger stripes. Awesome!
That is cute! My oldest loves making things with duct tape, I need to show her this!
How adorable!!
Okay, my Baby Miss would totally love this. She is such a purse kid, her first steps were walking to pick up my purse! HA!
That is so cute! My older daughter would have fun using duct tape and making these bags for her and her friends.
This bag is so cute! And who would of thought it was made of duct tape. Awesome!
This is really creative! I love it!
Pingback: Minnie in Paris Hairbow Headband Tutorial Disney