DIY And The Stockings Were Hung Christmas Sign
DIY And The Stockings Were Hung Christmas Sign I love about creating my own holiday decor and this craft makes it so easy to really personalize something and make it your own. With your...
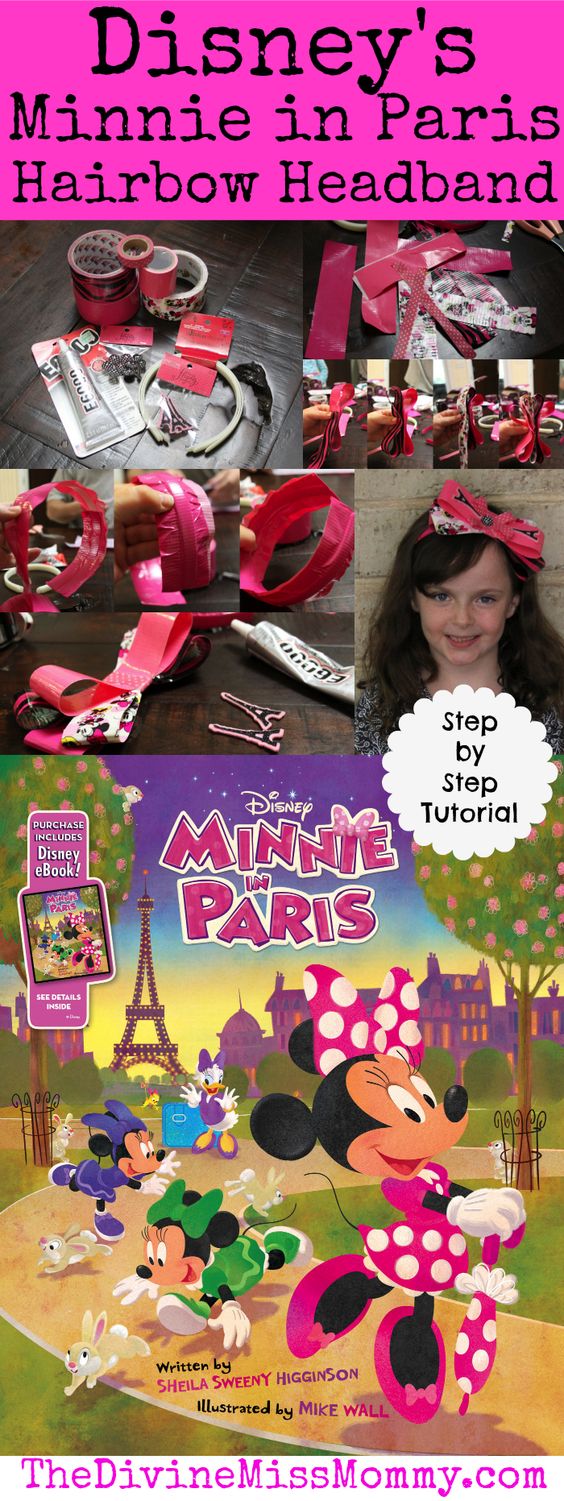 Minnie in Paris Hairbow Headband Tutorial
It is no secret around here that we are HUGE Disney fans. We love everything Disney. We visit Disney World a few times a year, we go on Disney Cruises and we watch pretty much everything has made. My daughter has long had a love affair with Minnie Mouse. She loves Minnie and she has dressed up as Minnie Mouse many times. We hope that you love this Minnie in Paris Hairbow Headband Tutorial.
We were excited when the book Minnie in Paris (see below) arrived. We instantly knew that we would create a hairbow with some duct tape and washi tape that we had on to create something fun with. We added a few more things like a few more tape varieties, glue, a plastic headband, Eiffel Tower embellishments, black with white polka dots charm. Our costs were about $6 for one completed hairbow headband plus we have lots of supplies left over.
And…my daughter just LOVES it. She wore it everywhere today and got so many compliments. It was fairly easy to make. All of the instructions are below.
Instructions are coming next week on how to make your own Minnie in Paris matching purse. Now find yourself a cute model like the one below to wear your fabulous creations.
You didn't think that I would leave you without telling you about the book, did you? Fashion is Minnie's passion! And, as a result, she's been invited to show her bows on the runways of Paris! Minnie in Paris begins At the airport, Minnie is so busy taking care of her nieces, Millie and Melody, that she accidentally switches suitcases with Penguini the magician–and finds that his suitcase is full of bunnies instead of bows!
Minnie must round up the mischievous little bunnies, find Penguini, and make her bows in time for the show. Will she make it? Readers are treated to a stunning tour of famous Parisian locations, from the Louvre to Tuilleries Gardens to the Eiffel tower, to a classic Parisian bistro—all in search of Penguini's bunnies.
Definitely get the Minnie in Paris book for any Minnie Mouse lovers in your household. We hope that you are inspired by this Minnie in Paris Hairbow Headband Tutorial. Happy crafting!
Minnie in Paris product page | Twitter | Facebook
Disclosure: This Minnie in Paris Hairbow Headband Tutorial post is part of a sponsored campaign for Minnie in Paris. Project idea and opinions are entirely my own. #MinnieinParis

DIY And The Stockings Were Hung Christmas Sign I love about creating my own holiday decor and this craft makes it so easy to really personalize something and make it your own. With your...

DIY Felt Christmas Gnomes If you have ever wanted to know how to make DIY Christmas gnomes how to make a gnome how to make fabric gnomes or how to make felt Christmas gnomes...

Home Depot Do-It-Herself Workshops Have you tried out these Home Depot Do-It-Herself Workshops yet? I have tried several of these workshops so far and I absolutely love them. A few years ago I did...
Compensation was provided by Elmer’s via Mode Media. The opinions expressed herein are those of the author and are not indicative of the opinions or positions of Elmer’s. Back to school season is quickly...

You can make anything with Duct Tape! Your little Parisian model is super cute!
How cute! I think Minnie should go to Seattle, WA to the Space Needle.
That is darling and so is your daughter in it. I am constantly amazed by the new duct tapes and all the crafts that can be done with it, This looks like a fun and easy craft !
That is so cute and I love that it’s so easy to make. It almost makes me wish I had a daughter 😉
I think this headband is so stinkin’ cute I can’t stand it! At first I thought it looked complicated, but after reading the instructions a couple of times, it didn’t. I cannot wait to surprise my little niece!
That is cute and I love it. Nice tutorial.
What a great DIY kids project! My son loves creating with tapes of all kinds, and I will be buying that glue as we have a project for the blog next week that requires that! thanks,
Mitch
Thank you for this,My daughter would love this,Its so cute.
Very cute…great tutorial! Isa would love to make the hairband.
This is so cute and the pictures really show you how to make the headband and purse. Now if only I had a little girl in my life.
How cute! My daughter is a Minnie fanatic, and would LOVE that headband. And the matching purse! Adorable!
These turned out SO cute!! I need to make some Minnie headbands for my daughter for our upcoming Disney Cruise.
My daughter is sitting next to me very excited about this tutorial! Thanks for the cute idea… very clever!
That is an incredibly cute headband, and looks simple enough to make. Thanks.
Instructions I can actually follow! 🙂 This is really cute. We are huge Disney lovers too. What a fun project to do with my daughters. And I recently won a roll of Duct tape from their facebook page about a week ago! Maybe they will send me something pink. 🙂
This is so cute! My daughter loves to do duct tape crafts. I think we’ll use this idea for a project this coming weekend!
Adorable! Love these easy DIY. The materials are so easy to gather, not hard to find love that. Would be cute for the kids playing dress up. My daughter loves Minnie!
My daughter loves Minnie. She is going to have so much fun doing this craft!
I love that there is hot pink duct tape in the world. What a cute way to craft with it!
I can’t believe that was done with duct tape! I absolutely love the results!
That turned out so cute and can’t wait to see how the purse comes out too. Minnie needs to go to London or Rome next!
This is super cute. My friend has two little girls and she’s really crafty. I’m definitely going to send her this post.
What a fun idea and super cute. I never would have thought to use tape to make a headband like that!
How cute, what minnie fan out there wouldn’t love it! Great craft project!
I love duct tape crafts! This Minnie headband turned out so cute!
A Minnie Mouse headband would have had me jumping for joy when I was little!!! Love this craft!
I love your finished result. E6000 is brilliant. Toxic stuff, but brilliant. And with my last name being Paris, AND a disney craft, I’m all over this!
This is such a ridiculously adorable idea!! I love Minnie and hadn’t even heard about Minnie in Paris yet, thanks for the head’s up!
Thanks for the step-by-step instructions. That headband is adorable and your daughter looks so proud wearing it. I myself am not too crafty but I might give this a try with my two granddaughters. Thanks 🙂
How cute and simple! My teen loves making items with duct tape.
How adorable! I’m absolutely loving these.
Very cute craft for kids! I think I could even make this.
she looks so grown up there. you made that look easy
How cute is this! My daughter would love to make one of these. She likes to make her own hair bows. So I know she would love this project. Thanks for the directions!
That is really cute and I think I could actually assemble this.
Oh my gosh, how cute is that!!! I love it! 2 of my favorite things; Disney and Paris!
that is such a fun little project and it ties into the Disney Paris theme so well. Duct tape rocks!
I love all the things you can do with tape. They are so cute and versatile. This was absolutely fabulous!
Great tutorial and post. Thank you for sharing. I know a couple little girls that would love this!!!!
This is ADORABLE! I think I’m going to have to add this new Minnie DVD to my family collection too!
I bet she loved it!! What a fun project!
Super cute! My daughter would love. She’s such a Minnie Mouse fan!
It sure is amazing what you can do with duct tape! my daughter even has a whole book of duct tape crafts but i need to get her some of that pink color!
That is so cute. I know my daughter would love it.
Your model looks so happy with her pretty Minnie hairbow and purse! Well done. And thanks for the how-to; you make it look a lot easier than I would have thought.
This is a great idea. I really like your instructions and detailed photos because I will be able to make great headbands for my girls based on them.
You are so creative!n My 5 yr old would love this craft. It is perfect for little ones to help too!
Fabulous and genius. Cannot wait until my daughter is old enough to craft.
Pingback: 25+ Duct Tape Crafts