DIY Dried Flower Violet Goat Milk Soap
DIY Dried Flower Violet Goat Milk Soap Recipe Looking for a goat milk soap recipe? I love a good soap. I prefer moisturizing soaps that smell good and leave my skin feeling soft. This...


1 Plastic Bag (I use a small black one like you get for pet pickup or diaper bags)
1 Flat Lego (any color)
Wood Burner or Solder iron
Sharp Knife
1. Lay the Lego pieces on a piece for cardboard. Take the wood burner or solder iron and melt a hole on the top about ¼ from the end of the Lego. Do the same on the other end. You may need to move the burner around a little to make the hole bigger. Take a the knife (I use an X-Acto knife) and scrap the inside of the hole and any ruff edges from where you melted the holes.


Now we want to make the band. For this we will cut of the end of the bag that is sealed. Then lay the bag flat and fold it, as it is easier to cut this way. Cut it into about ¼ inch pieces. Make sure when you cut it that you do it cross ways and not the length of the bag. Now take the cut pieces and open them up.


Take one piece and run it through another and then back through its self so that they are locked together. Then add another piece to that one. You should now have 3 pieces locked together. Make three of the three piece chains. Tie one end so that all three pieces are tide together. Now you will braid them, crossing one piece over the other until you have made it all the way to the end. Repeat this to make two more braids so that you have a total of three braids.


Then take all three brads and tie them together at one end and brad them all together. Put a tight knot at each end of the finished brad and cut off the fringe side of the knot so that the braid it still intact.


Now looking at the top of the Lego, feed one end of the braid down through the hole and then back up through the other hole. Place on wrist and tie the two ends of the brad together. There you have it, a nice plastic bag Lego bracelet!


 For more fabulous ideas, check out my
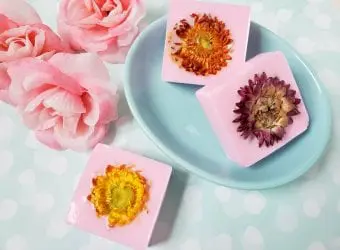
DIY Dried Flower Violet Goat Milk Soap Recipe Looking for a goat milk soap recipe? I love a good soap. I prefer moisturizing soaps that smell good and leave my skin feeling soft. This...
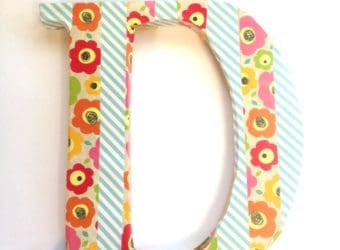
Washi Tape Ideas: Letter Art Crafts for Letter D Turn an ordinary letter into something extraordinary when you add a little washi tape. This DIY washi tape monogram letter is perfect for displaying in...
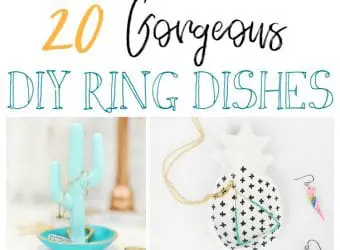
DIY Ring Dish Ideas As a fan of DIY gifts, I find a ring dish holder to be the perfect craft. There's a special feeling that comes with creating a gift personalized for the...
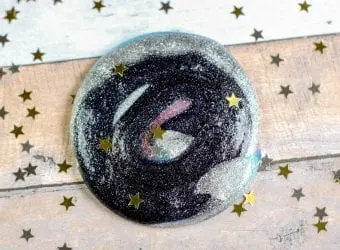
Easy DIY Galaxy Slime Recipe You ever have one of those days where the weather is awful and the kids are going crazy with boredom? Why not make some DIY slime! This Galaxy Slime...

Comments are closed.